Too broke to buy a lift but
embarrassed when you're hi-centered on speed bumps in the McDonald's drive
thru?
Save your cheeseburger money for a few weeks & we can fix
that.
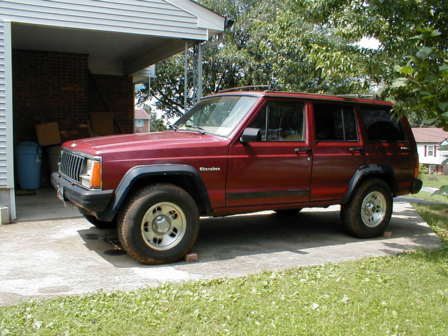 Before - Your basic 1984 XJ. Sure, it has a 3.4L but it was time to add a little lift to go along with that motor! Project XJ - 3.4L Engine Swap into this XJ. |
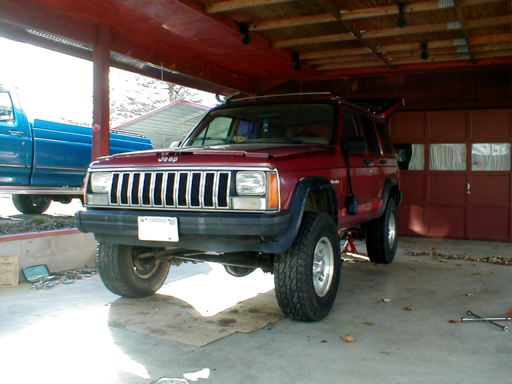
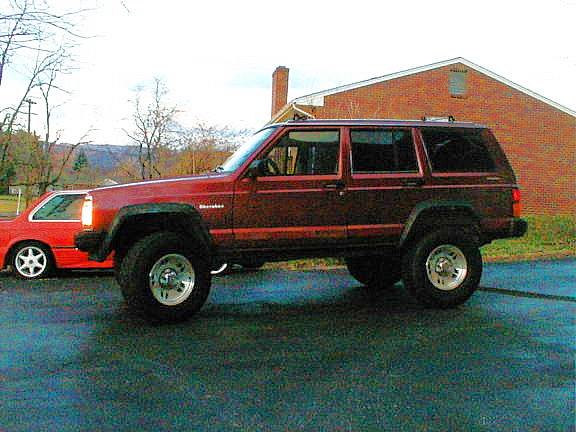 After - A little lift goes a long way! This budget lift netted 4" front & back (not including tires...) with a firm ride but NOT objectionally so! |
PLEASE READ!NOTE!: This is a starter / BUDGET LIFT for someone who wants an easy & inexpensive lift that won't break the bank yet has built in upgradability for later mods!YES, the F150 coils we used are "stiff" so if you're the type who whines about ride quality in the same breath as saying you want a -=CHEAP=- lift then please sell your XJ to someone who'll enjoy it...
|
Why do a 'Budget Lift'?
First off... this lift doesn't come in a big ol' brown truck delivered to your door, the boneyard parts involved ain't pretty, it ain't "cool", it won't ride like a new Cadillac and you won't get a really coooool sticker to go on your windsheld but it -IS- CHEAP and very functional both on and off-road. If you need to save some major cash & want to get an easy 4" of lift (more or less...) then you've come to the right place. Some of the parts listed were new, some were used. If you can score these parts as freebie discards you can easily lift your XJ for under $50 including beer. I did buy new coils for this project but I'm willing to bet that the same boneyard where I got the rear leafs would have sold me a set for next to nothing.
Why NOT do a 'Budget Lift"?
Here's a friendly warning! If you're a weenie about things like
"I want an exact 3.5699392288 inch lift and not a bit more or less."
- Get lost. I can't help you. No one can help
you.
Same thing for people who say "I expect it to ride like a
Cadillac and flex like a $10,000,000 rock-buggy."
- Flex this, buddy.
You're S.O.L.
Back to the reasons to do a 'Budget Lift'!
There is absolutely NOTHING wrong with a hi-dollar lift shipped right to your door... most of them are worth the money if you're looking for a complete package and don't mind paying the $$$ for them. On the other hand, if you're broke, cheap, don't mind not knowing the exact lift until you're done, or maybe don't absolutely need that lift kit's window sticker then here's an inexpensive alternative to the 'kits' out on the market.
This lift will get you about 4
inches of lift if done the same way we did it but you can mix & match
springs with your old ones and vary things a bit. That's also not including any
tire changes. Your final lift amount may be different but should be close to
our results.
Again! If you use the F-150 coils this
lift --WILL-- have a firm ride up front! If you're really after
maximum ultra-super-flex or just like to whine 24/7 about ride
quality... then this lift isn't for you and you should plan on spending LOTS
more money than we did. (Ya pansy dweeb.
![]() )
)
UPDATE! Use Grand Cherokee Up-Country V-8 coils instead.
(Part number added to list below!) You'll have a smoother and more flexier
ride... That way you can whine about something else!
![]()
This lift is for someone who wants a decent lift that will do the job and can be changed later to suit their own needs/wants. You can keep the Dakota leafs as is, swap around between packs, add them together etc & get from 2 - 5" from the rear without buying another single leaf. I'll also add that since the lift is on the Dakota rear leaf springs are VERY flexy & a great basis for adding lift shackles should you decide to pick up some taller front coils.
The Ford or UpCountry Grand Cherokee coils will get you 2"... add the poly spacer & you're at 4"... If you plan to upgrade later then you can keep the spacer & swap in 3" XJ coils for more height & flex.
What we used:
1991 Dodge
Dakota rear leaf springs - USED $52.26 inc. tax. |
| Leaf spring
pins: Leaf spring pins Leaf spring clamps: Leaf spring clamps |
| M10-24 coupler nuts & some M10-24 x 55mm allen head bolts
to extend the front swaybar links. That set me back all of $7.00 or so for
enough to do two XJ's. (You can also use rear swaybar links off an F350 truck,
about 78-79 year model as they are longer than XJ front swaybar
links.) Update - One swaybar link snapped so both were removed and replaced with quick disconnects! Sway Bar Quick Disconnects - various sizes to fit lift |
| SHOCK STUD EXTENSIONS Mr. Gasket 1290 Shock Stud Extensions Use & installation are described further here: Shock stud extensions These allowed my son to keep his old stock XJ front shocks a few weeks until he could afford new ones and were removed when the new lift shocks were installed. |
|
UPDATE: I highly recommend that you use Grand Cherokee V8 coil springs with an extra
set of oem isolators instead of the Ford coils! You will get a flexier and much smoother ride with the same relative lift from these coil springs. Moog CC782 Variable Rate Coil Spring Use OEM style Grand Cherokee spring isolators or these Rubicon Express units: Rubicon Express RE1340 Coil Spring Isolator NO LONGER RECOMMENDED but if you have some laying around these are the F150 Coil Springs (Part # CS8228) that we used. They come from 1965-1979 F100 & F250 trucks or 1975-1979 F150 trucks: ACDelco 45H1025 Professional Front Coil Spring Set |
| 1 3/4"
front poly coil spacers. - USED. Paid about $35 for them new. You can get most any size you need to level your ride after lifting here: XJ front coil spring spacers - VARIOUS SIZES |
Shocks for 4 - 5" of liftWe ended up using new Heckethorn / RC 5" lift shocks from Davys-Offroad-Products but his eBay store is no longer open. We paid $117 shipped for the 5" lift shocks w/ boots. Davy was a great guy to deal with and very quick shipping direct from the factory. He also had LCA's for around $88. Sorry to see his store closed!You can find lift shocks here:Shocks for lifted Jeep Cherokee XJ's |
Shocks for ~3" of liftSHOCKS - You have a few options on shocks and can save some $$$ by going the "Monroe" route on shocks... ya end up with a 'lifetime' warranty to boot. These are best used for 3" of final lift.Monroe GasMatics. I tried to install these at first but unfortunately did not find a set of the correct bushings. These shocks WILL work but I didn't figure out how to make them work until after returning them! You must be prepared to make them work as noted below. FRONT - You can use Front shocks for 1987 - 1995 Wrangler 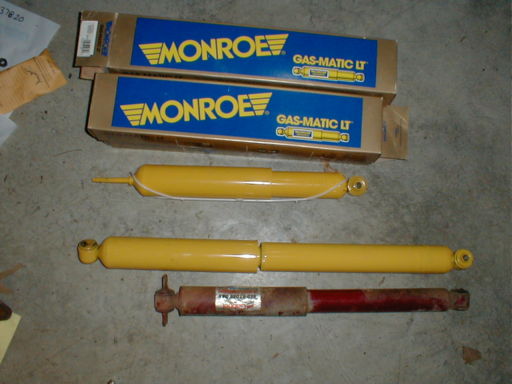 REAR - Shocks for 1995 ford f150 4wd have the perfect length for up to ~4" lift but you need to swap the lower bushings out. You need to visually check these before leaving the store as these trucks had 4 shocks and one pair is longer than the other... get the longer ones! Bilstein 24-016186 Rear Shock for Ford 4WD |
Shocks for ~2-3" of liftCredit to RockLizard for digging these up! Check out his FANTASTIC Budget Boost article which does a great job of covering budget boosting. I think he's even a bigger cheapskate than I am... I like it! If you're looking for a great boost for 2" of lift... check it out! Monroe Sensa-Trac shocks. FRONT: Vehicle: 1993 - 1998 JEEP GRAND CHEROKEE LIMITED -WITH- Up-Country Suspension Engine: V8 5.2 Liter FI Shock Absorber: Front; (Zj Chassis); With Up Country Suspension Grand Cherokee FRONT shocks that can work with XJ budget lift Sensa-Trac Part Number: 37193 REAR: Vehicle: 1986 - 1992 JEEP COMANCHE Engine: all Jeep Comanche rear shocks for budget lift Sensa-Trac Truck Shock Absorber: Rear Part #37029 UPDATE: Ron emailed me that he used Monroe shocks for a stock Commanche when doing his 2" lift. |
|
Cheapo Bar Pin Eliminators Cheapo Rear Bumpstop Extensions Aftermarket bump stops for various lift heights Cheapo Puckstop spacers Cheapo Transmission Mount Drop YJ Slip yoke YJ Brake Hoses |
|
|
Bridgestone
REVO 31 x 10.5 x 15 tires.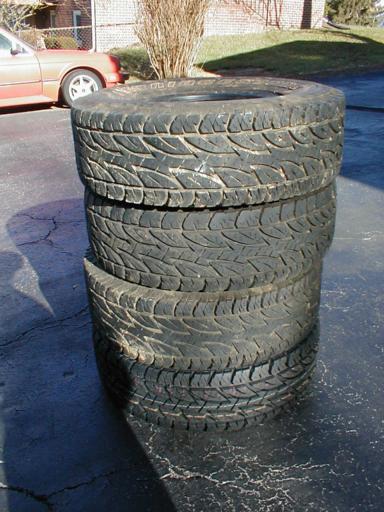 $50 for three nearly new REVO's off a wrecked XJ plus one NEW tire bought for $125 to make a set... $175.00 total! Unfortunately, one of the used ones has a ruptured belt from a sidewall hit & will have to be replaced soon making it TWO new tires & $300 total for a $500 set of tires. Rats. 31 x 10.5 x 15 off road tires |
Click here to visit Another Freakin' Jeep Parts Store!
Doing the XJ Budget Lift
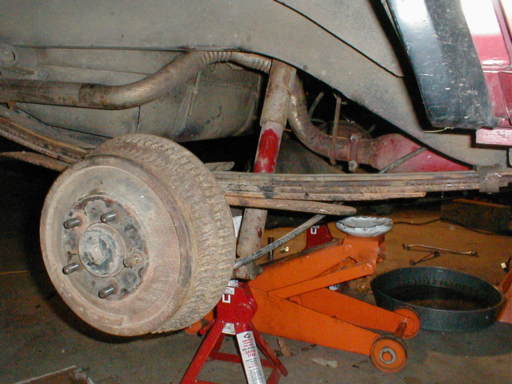
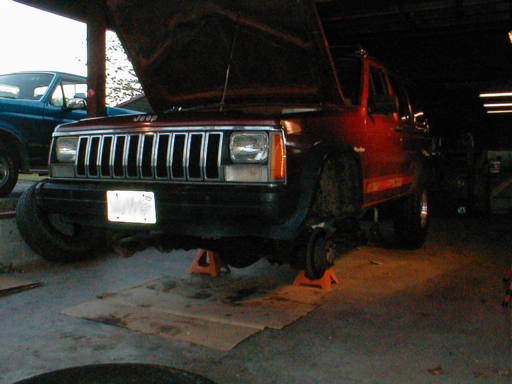 Put it up on jack stands |
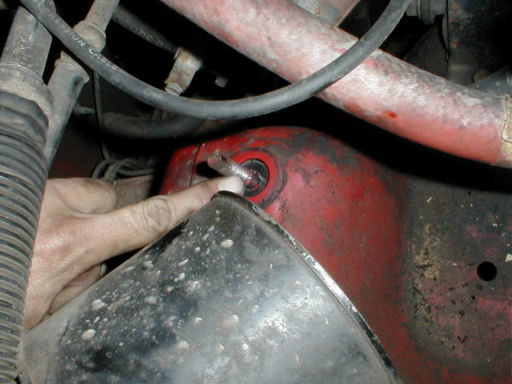 To gain a bit more droop, disconnect both shocks. I also disconnected the sway bar links but be forewarned that the upper link studs generally twist off & you'll probably end up buying disco links or snagging a used set from one of your buddys. |
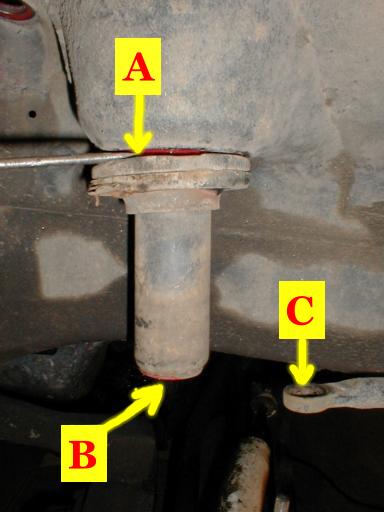
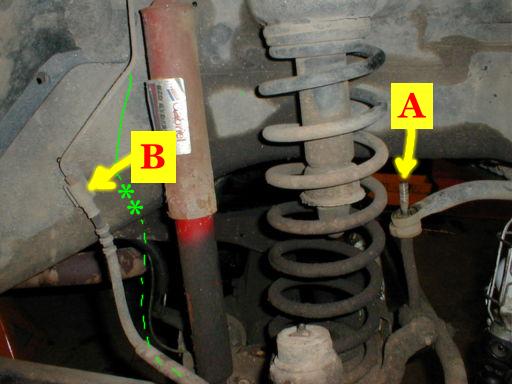 "A" -Above shows passenger side swaybar link's nut has been removed to allow axle to droop further. We'll use 2 coupler / union nuts and 2 bolts to extend the swaybar links later. "B" -Above shows oem location for brake hose... green '*' shows two new holes to be drilled to relocate brake hose mount. (Stock brake hoses need this to get a couple more inches reach.) 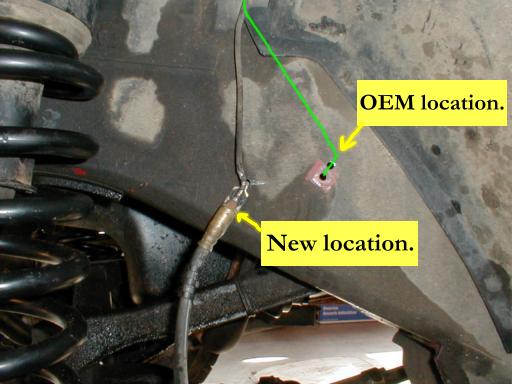 (Pic of driver side brake hard line after relocation.) |
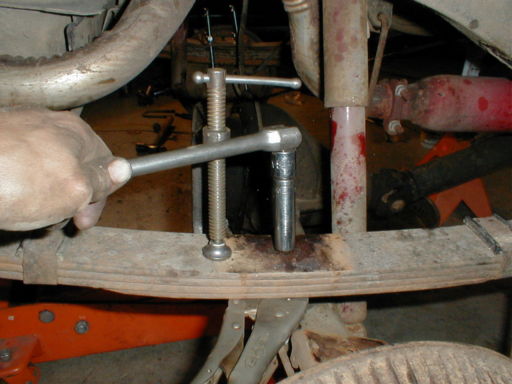
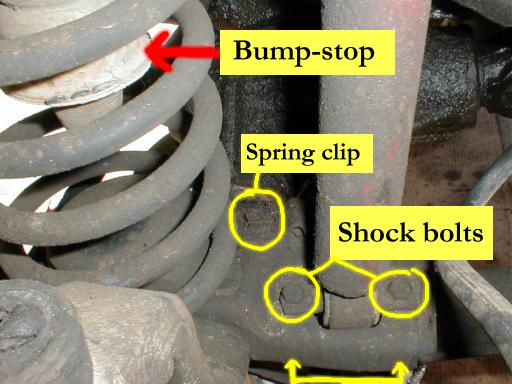 Remove both shock bolts (nuts underneath!) and the coil spring clip. 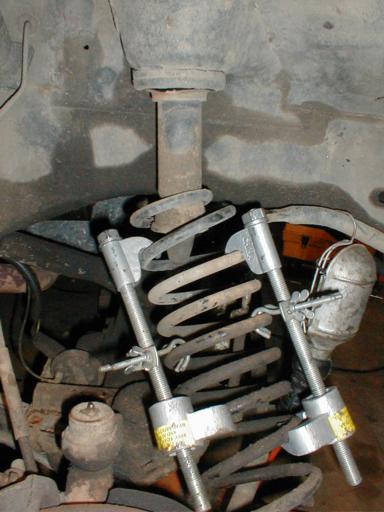 Use the floor jack to do the hard work! Jack up the axle FIRST as high as it will go and THEN put the coil spring compressors Tighten them up EVENLY and then lower the jack... coils are compressed & ready to fall out! DO NOT USE AIR TOOLS ON COIL COMPRESSORS! USE SAFETY HOOKS ON COMPRESSORS AS SHOWN! |
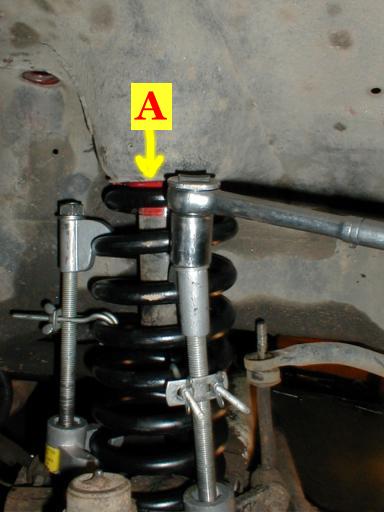
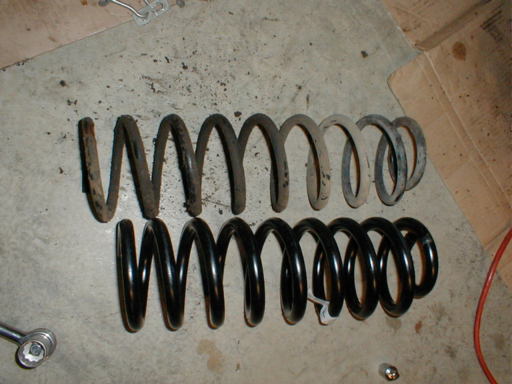 "Great Guacamole, Batman! The new FORD coils were shorter than the old ones!" Have no fear! The new springs -are- physically shorter but quite a bit stouter & won't compress as much as the old springs. Remember! I now recommend you use the Grand Cherokee springs instead! |
 "A" - Remove bumpstop, then use a flat screwdriver to remove stock isolator. "B" - I used channel locks to remove bumpstop. (* - On older XJ's it unscrews; newer XJ's are welded - skip this but expect a little extra effort to install new springs.) "C" - Note how when other side of axle is jacked up the sway bar link has dropped down by at least 4" & isn't fighting to keep the axle up. |
 "A" - Shows stock isolator is removed for this step. With the stock isolator gone, slip the new coil up into the pocket & jack the axle up as high as possible to compress the NEW coil. Once compressed by jack, attach coil spring compressors |
Once your coil spring compressors Lift new coil back up into place AND REINSTALL THE BUMPSTOP BEFORE SEATING COIL!!!! It takes a bit of fidgeting but get the bumpstop rethreaded before ya seat the new coil in it's pocket. A friend (or a crowbar!) levering the axle down may be needed to help slip the coil across the lower perch pad. Reattach the lower coil clip, install new shock appropriate for your lift then get ready for the other side! Leave the sway bar disconnected - makes it easier, remember!? Plus we're gonna save some more $$$ by extending those stock links later!!! |
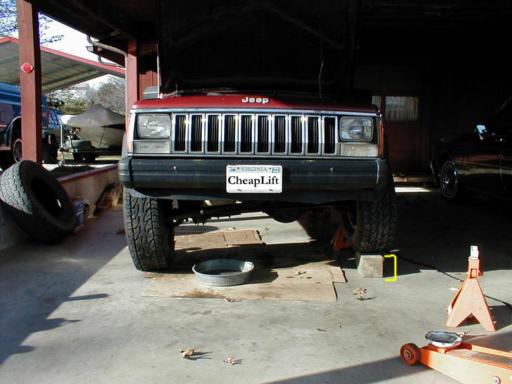 Passenger side tire is on the ground... driver side tire is up on a 6X6" block & the bumper is nearly level! This combo (with tires) is going to net him about 5" if this is any indication... Coils & poly spacer netted 4" of lift with the stock isolators + change from 235x15's to 31x10.50x15's. Treat the driver side the same... Just take your time & expect to do a little jack-work from side to side and let the jack do most of the work compressing the coils. |
 Longer lower control arms are also a good idea but WE had NO problems other than the axle being shifted back slightly from normal. Now on to the rear springs... |
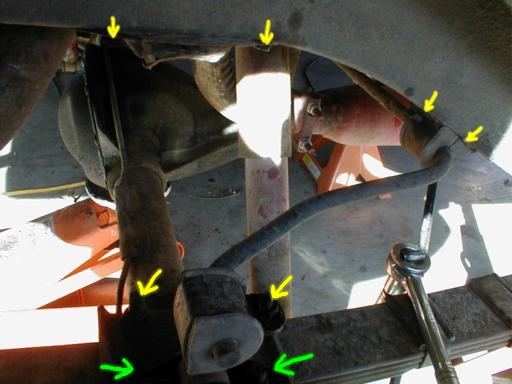 Remove rear swaybar and bumpstops. (Bolts marked w/ arrows.) My son's bumpstops were nothing more than memories so we'll replace them along with home-made bumpstop spacers to keep the tires outta the fenders. Make your own rear bumpstop extenders. If your XJ has a rear sway bar... time to remove and toss it! Several factory packages did NOT have rear sway bars and they can be safely removed. Plus you get to use the bracket (green arrows) to make your own upper rear bar pin eliminators! |
 Swaybar, remains of bumpstops, stock u-bolts and u-bolt plate are off. We'll be leaving the main-leaf in place so no worries about leaf bolts at this time. Remove the
wrap around spring clips. I used a flat chisel & hammer to pop up the tab
enough to tap them loose with the hammer itself. Set them aside or toss them
depending on condition. |
 Moving to the Dakota packs... these spring clamps were much better than the oem XJ ones and came off relatively intact and were reusable. Pull them all from both packs & set aside. |
You'll need to separate the Dakota pack just as you did the XJ pack but mark these and be sure to keep these leafs seperate from the XJ ones and IN ORDER front to back and in 2 stacks. You'll note that there are some nifty sliders between each leaf... don't forget to reuse those! Now, hold your Dakota main-leaf up to existing XJ main-leaf still on vehicle. Orient the Dakota front bushing toward the XJ's front so that the center pin holes are aligned! Now mark the rear of the Dakota pack for cutting right at the end of the XJ leaf. (About 4" from Dakota rear bushing...) |
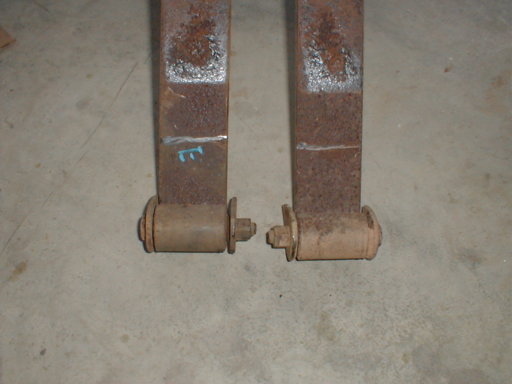 Marks are shown for rear cuts on Dakota main-leafs. Front bushings were marked for cut off right at other 'eye' which lined up pretty much spot-on w/ XJ front eye with center pin hole aligned. |
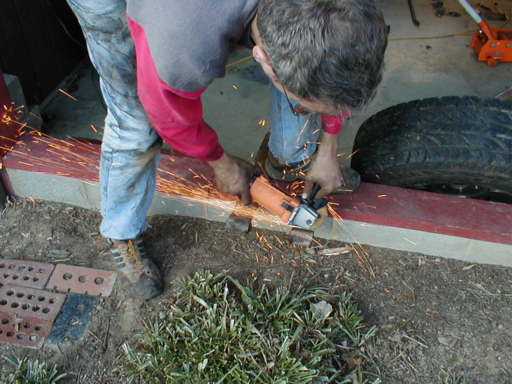 A $15 Harbor Freight 4" grinder makes easy work of all 4 eyes in 15 minutes, if you don't have a Harbor Freight near you try one of these 4" angle grinders Be sure to wear safety glasses! |
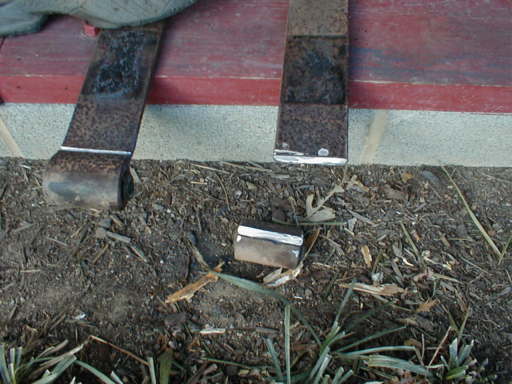 Cut all four eyes on the marks and clean up the cuts while you have the grinder handy. For style points, slap some rattle can paint on the cuts. |
Be sure to re-check the pin alignment but this time use the entire set of leafs for that side. Now lay out the leafs for final assembly. Grease em up! I used some "moly-lube" on all the leafs top & bottom plus the Dakota 'sliders' from between the leafs. Alternatives include: graphite paint (heavy equipment & farm suppliers have it), leaf spring teflon strips or if you don't mind the occasional squeak - just use axle grease! Stack the Dakota leafs and align them to the XJ main-leaf using a new pin. Pin goes up from bottom so expect it to drop out 2 or 68 times... I used lock nuts on the top. Don't tighten all the way yet. |
 Here is the assembled 'new' pack with all of the Dakota leafs in place below the XJ's main-leaf. The Dakota overload / 'helper' spring (lowest leaf - sticking out level) is almost 1/2" thick! Entirely optional as to how YOU mix & match your pack. (We removed the overload / helper spring for now.) BE SURE YOU PROPERLY TORQUE DOWN THE U-BOLTS! NEW U-BOLTS ARE -HIGHLY- RECOMMENDED! |
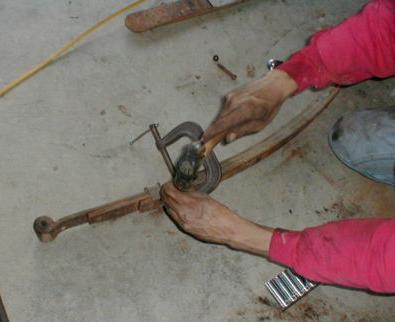
(Take your old ones with you.)  Installation is simple - just put the 'c' shaped clip under the leaf pack and the flat plate goes on top with the 'c' clip's ears going through the slots. (Note tab on clip goes to hole in spring.)  Use a c-clamp to compress the pack if necessary & bend the ears over with a hammer. 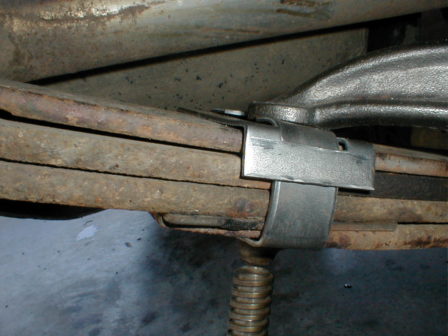 |
| Shocks:
Quick
note on the shocks: NEW Rear Shock Mod's Required:
New FRONT Shock Mod's Required:
|
Quick
notes!
Stock shocks MAX OUT with the Dakota overload spring and no BPE. With this combo the shocks MUST be replaced NOW! By converting your rear sway bar bracket to upper BPE's & omitting the Dakota helper leaf you can keep the stock shocks for a while... but be prepared: you WILL be replacing them. Front brake hard lines relocation is mandantory! Extended hoses are highly recommended up front. Be sure to extend the rear diff vent hose while yer under there.At 4" + lift the rear brake hose MUST be replaced with a longer hose! I had a spare stainless Pro-Comp hose layin' around but you can just hit NAPA for a YJ rear hose! 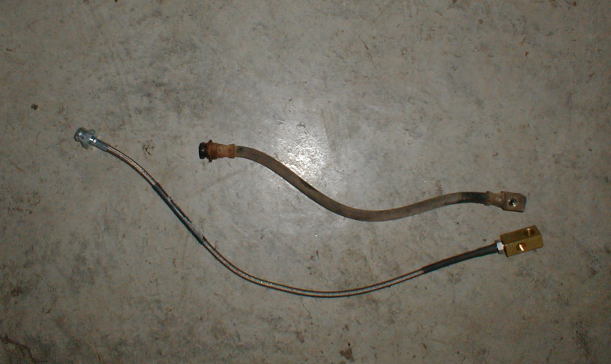 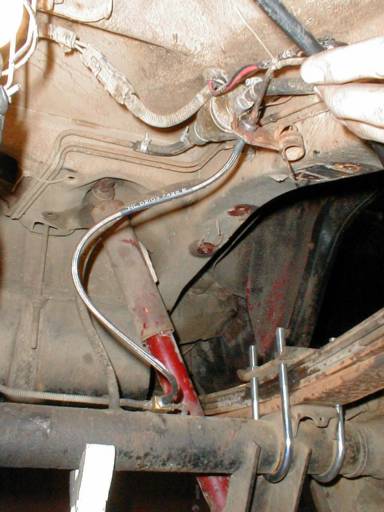 |
 This is at 4 1/2" before I removed the 1/2" thick 'helper' spring from the Dakota pack. As you can see, the original slip yoke was about 1 1/2" out farther on the output shaft than it was before. By removing the 'helper' leaf & dropping the transmission crossmember down I got the yoke back to about 3/4" & no vibes so far but you'll want to swap in a YJ slip yoke & maybe even extend the driveshaft 1/2" or so. (Of course... a slip yoke eliminator for your Jeep (SYE) |
Here's some CHEAP tips to help ya out with this lift if $$$ is tight: |
|
Final Updates 5 months later: Ride was firm without being harsh & so far no bumpsteer or wobble! The Dakota leafs are very flexy without that monster helper spring in there... We may add the XJ helper in later but the rear springs should do really well off-road! Front coils -are- firm but surprisingly comfortable given all the whining and doom-saying regarding the F150 coils. It's more of a 'quick return' to the road when hitting bumps rather than any harshness. Keep in mind... I'm old. I grew up driving cars that would scare people these days so what I see as a comfortable ride may have you reaching for the Preparation H... Final results: We netted 4" front and back from the hard parts -PLUS- another 1" from the bigger tires for a total of 5" over where he sat before!!! This swap looks great, is quite easy to do and fairly easy on the wallet! I pulled the 'helper' springs from the Dakota packs to level things up and that also allowed us to reuse the original u-bolts. I have not drilled the trackbar bracket as everything settled in at only 3/4" off center. This would mean any holes drilled would be too close to the existing trackbar holes & need welding. I'm honestly not too worried about it as it's not very noticable & drives just fine! (Plus I'm giving him my adjustable trackbar later...) A year later: My son traded this XJ off (*argh!*) but I spotted it on the road about a year later. A few months after that I spoke to a guy at a local tire store who was bragging about this XJ's performance off-road in the hands of it's new owner. Moral of the story: Ya don't need deep pockets to build up your XJ! CHEAP IS GOOD! |
Update: Hey - Check out RockLizard's 2" budget boost article!
His FANTASTIC Budget Boost article does a great job of
covering budget boosting your XJ.
If you're looking for a great boost for 2"
of lift... check it out!
If you have pics of your own repairs or can suggest other methods - please contribute your ideas (and pictures) to this article!
|
|
|
Revised on:
December 6th, 2015 |